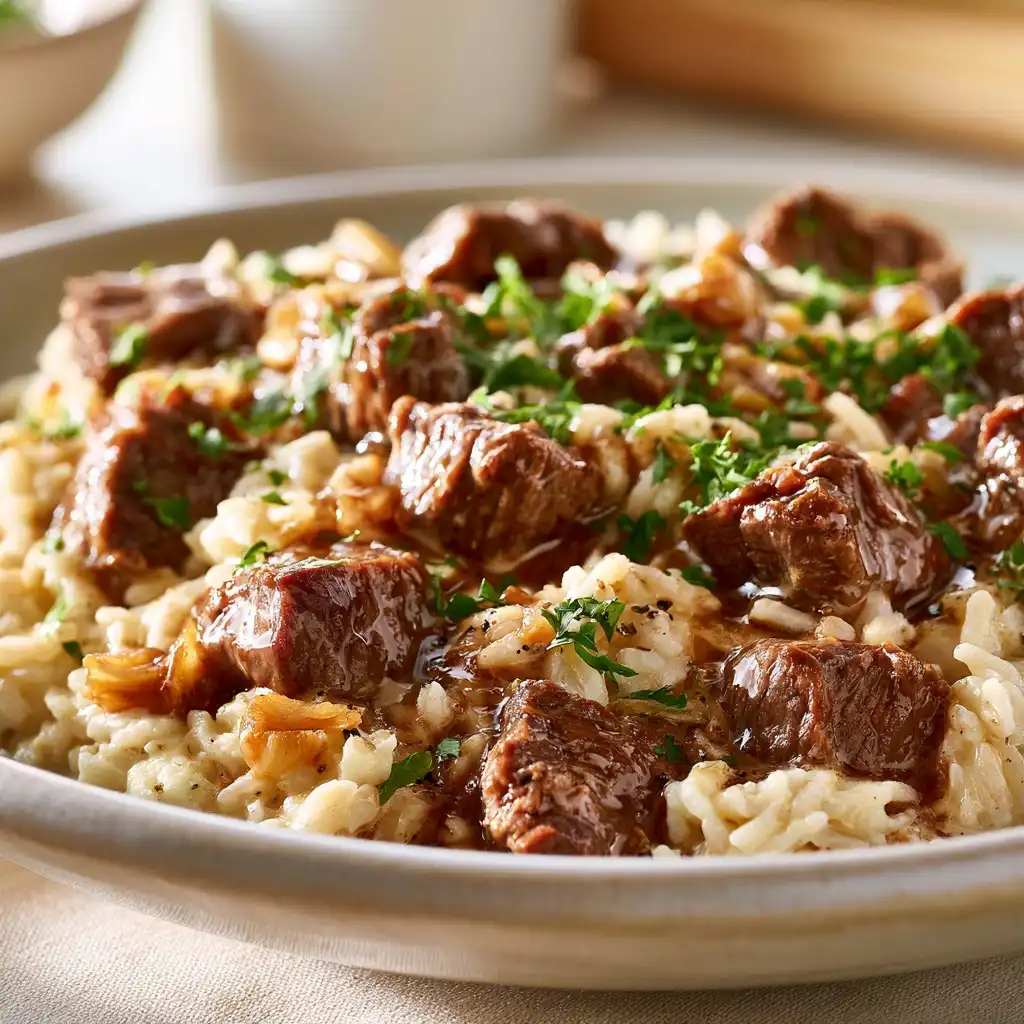
A cheesy beef burrito skillet is a one-pan, stovetop dinner that combines seasoned ground beef, fluffy rice, black beans, and melted cheddar cheese into a satisfying meal. This quick dinner requires minimal prep and cleanup while delivering authentic burrito flavors without the tortilla. Ready in under 30 minutes, it’s an ideal solution for busy weeknights when you need something delicious, filling, and fuss-free.
| Prep Time | Cook Time | Total Time | Servings | Difficulty | Cuisine |
|---|---|---|---|---|---|
| 10 minutes | 20 minutes | 30 minutes | 4 servings | Easy | Mexican-American |

Why This Recipe Works
This cheesy beef burrito skillet delivers restaurant-quality flavor in a single pan because it layers each ingredient strategically for maximum flavor absorption. The ground beef builds a savory foundation that seasons the rice and beans as they cook together, creating depth without extra sauces or complicated techniques. Cooking everything simultaneously saves time while the melted cheddar cheese binds all components into a cohesive, satisfying dish that tastes like it took hours.
The quick dinner format solves the common problem of weeknight meal planning: you need protein, vegetables, grains, and satisfaction in under 30 minutes without multiple cookware pieces to wash. This skillet accomplishes all that in one 12-inch cast iron or stainless steel pan, eliminating post-dinner cleanup frustration. The combination of textures—tender beef, fluffy rice, creamy beans, and stretchy cheese—keeps every bite interesting and prevents the meal from feeling monotonous.
Nutritionally, this one-pan dinner provides complete protein from beef and beans, essential carbohydrates from rice, and calcium from cheese. The taco seasoning delivers concentrated flavor that would normally require multiple dried spices, making this both convenient and economical for budget-conscious home cooks.
Ingredients
These seven essential ingredients create an authentic cheesy beef burrito skillet without requiring specialty products or hard-to-find items.
| Ingredient | Quantity | Notes |
|---|---|---|
| Ground beef (90/10 lean) | 1.5 pounds | Choose ground beef with minimal fat for cleaner cooking; grassfed varieties add richer flavor |
| Long-grain white rice | 1.5 cups | Uncooked; jasmine or basmati rice cooks slightly faster and adds subtle flavor |
| Black beans (canned) | 1 (15 oz) can | Drained and rinsed to reduce sodium; unsalted varieties give you seasoning control |
| Shredded cheddar cheese | 2 cups | Freshly shredded melts smoother than pre-shredded varieties; sharp cheddar intensifies flavor |
| Salsa (medium heat) | 1.5 cups | Mild for family preferences; hot salsa adds kick without extra heat sources |
| Taco seasoning | 1 packet (1.25 oz) or 3 tablespoons homemade blend | Homemade blend: 1 tbsp chili powder, 1 tbsp cumin, 1 tsp paprika, 1 tsp garlic powder, 1/2 tsp onion powder |
| Chicken or beef broth | 1.5 cups | Low-sodium broth prevents over-salting; vegetable broth works as substitute |
Step-by-Step Instructions
Prep Phase
- Measure out all ingredients into separate bowls before starting. This mise en place approach prevents scrambling for items mid-cooking and ensures nothing burns while you search for ingredients.
- Drain and rinse the canned black beans under cold running water for 30 seconds. This removes excess sodium and starch that would make the skillet gummy.
- Shred cheddar cheese directly from the block using the large holes of a box grater. Avoid pre-shredded varieties which contain anti-caking agents that prevent melting.
Cooking Phase
- Heat a 12-inch skillet over medium-high heat for 1 minute until a water droplet sizzles immediately upon contact.
- Add the ground beef directly to the hot skillet, breaking it into 1/2-inch pieces with a wooden spoon as it cooks. Cook for 5 minutes, stirring occasionally, until the beef is no longer pink and has developed light brown color on some pieces.
- Sprinkle the taco seasoning over the cooked beef and stir constantly for 30 seconds to coat every piece. This brief toasting activates the spice flavors and prevents clumping.
- Pour in the salsa and stir to combine with the seasoned beef, creating a rich sauce base. Cook for 1 minute while scraping any browned bits from the skillet bottom.
- Add the uncooked rice to the skillet and stir for 2 minutes. This toasting step coats the rice grains with oil and improves texture, preventing mushiness.
- Pour in the broth slowly while stirring constantly to prevent rice clumping. Bring the liquid to a rolling boil over 2 minutes.
- Reduce heat to low, cover the skillet with a lid or aluminum foil, and simmer for 12 minutes without lifting the cover. Lifting the cover releases steam and interrupts the cooking process.
Finishing Phase
- Remove the lid and check that rice grains are tender and most liquid has absorbed. If liquid remains, cover and cook 2 more minutes.
- Scatter the drained black beans over the rice and gently fold them in using a rubber spatula. Beans only need warming through since they’re already cooked.
- Sprinkle the shredded cheddar cheese evenly over the entire surface of the skillet. Increase heat to medium and cook uncovered for 2 minutes until the cheese begins melting.
- Cover the skillet for 1 minute to trap heat and complete the melting process. The cheese will become completely smooth and glossy.
- Remove from heat and let rest uncovered for 2 minutes. This prevents the cheese from continuing to cook and becoming grainy.
Pro Tips for Best Results
- Toast the uncooked rice directly in the beef fat before adding liquid. This coating prevents starch from releasing excessively, ensuring fluffy individual grains rather than gummy paste. Professional cooks call this the pilaf method, and it transforms ordinary rice into restaurant-quality texture.
- Use a meat thermometer to verify ground beef doneness at 160°F internal temperature rather than relying on color alone. Some bacteria in ground beef turns brown during cooking before reaching safe temperatures, so measurement ensures food safety without overcooking.
- Never lift the skillet lid during the rice simmering phase. Each lift drops the internal temperature by 10-15 degrees, requiring additional cooking time and drying out the rice. Trust the timing and resist the urge to peek.
- Add the cheese in two stages: first half melted into the rice, second half sprinkled on top for visual appeal and textural contrast. This layering creates depth and prevents a uniform, one-note cheese flavor.
- Keep beef broth at room temperature before adding to the skillet. Cold broth shocks the hot rice and temporarily stops cooking, resulting in uneven texture with some grains undercooked and others overcooked.
- Select a skillet with a tight-fitting lid rather than relying on aluminum foil. Foil creates steam pockets that cause uneven cooking; a proper lid distributes heat evenly and maintains consistent moisture levels.
Common Mistakes to Avoid
Overcrowding the skillet with too much meat at once: Meat releases steam that prevents browning, creating boiled beef instead of properly seared pieces. The solution is working in batches if you’re using a smaller skillet, or using a 12-inch skillet minimum. Brown the beef properly in a single layer for best flavor development.
Using pre-shredded cheese: Commercial anti-caking agents prevent cheese from melting smoothly, resulting in grainy, clumpy texture that separates into grease pools. Always shred cheese from a block within 15 minutes of cooking. If you must use pre-shredded, toss it with 1 tablespoon of cornstarch to improve melting slightly.
Skipping the rice toasting step: Untoasted rice absorbs too much moisture and turns mushy or gummy. This step requires just 2 minutes but dramatically improves the final texture. You’ll notice the rice grains turning slightly translucent and smelling nutty when properly toasted.
Adding all the cheese at once after cooking: Excess heat can cause the cheese proteins to tighten, separating into grease and solids. Add cheese off-heat or over residual heat only, then cover to melt gently. If the skillet remains over direct heat, reduce to the lowest setting.
Not draining canned beans thoroughly: Excess liquid throws off the rice-to-liquid ratio, resulting in overcooked, mushy rice. Drain beans for a full 30 seconds under running water, then shake the colander vigorously to remove trapped moisture. This step makes a noticeable difference in final texture.
Variations and Substitutions
Customize this cheesy beef burrito skillet by swapping individual components while maintaining the essential structure and cooking method.
| Ingredient | Substitution | Flavor Impact |
|---|---|---|
| Ground beef | Ground turkey or ground chicken | Leaner protein with milder, less savory flavor; requires reducing salt slightly as poultry is naturally less assertive |
| Black beans | Pinto beans, kidney beans, or refried beans | Pinto adds earthiness; kidney beans contribute stronger flavor; refried beans create creamier texture and require less liquid |
| Cheddar cheese | Monterey Jack, pepper jack, or Colby | Monterey Jack adds richness and creaminess; pepper jack brings subtle heat; Colby provides milder, buttery quality |
| White rice | Brown rice or wild rice blend | Brown rice adds nuttiness and texture but requires additional 5 minutes cooking time and extra 1/4 cup broth; wild rice creates chewier bite |
| Medium salsa | Pico de gallo, corn salsa, or roasted tomato sauce | Pico de gallo adds fresh acidity and texture; corn salsa brings sweetness; roasted tomato creates deeper umami |
| Taco seasoning | Homemade blend or fajita seasoning | Homemade blend offers fresher spice profile; fajita seasoning adds more peppers for smoky complexity |
Serving Ideas
Serve the cheesy beef burrito skillet directly from the pan at the dinner table for a casual, family-style presentation that encourages seconds. Place the skillet on a wooden trivet or heat-resistant mat at the center, with small bowls of fresh lime wedges, diced red onion, and chopped cilantro on the sides for personalization.
For weeknight family dinners, offer crispy tortilla chips alongside the skillet with a small bowl of salsa for dipping. The chips provide textural contrast and their saltiness complements the cheese-forward skillet. This pairing transforms the meal into a build-your-own burrito bowl experience.
Pair with a simple side salad dressed with lime vinaigrette and cooling toppings like diced cucumber, avocado, and red radish slices. The fresh, acidic salad balances the richness of the cheese and beef, making the meal feel lighter and more complete. Serve the salad on chilled plates to maintain temperature contrast.
For meal prep Sunday, portion the cooled skillet into individual glass containers with diced bell peppers and sour cream on top. This creates grab-and-go lunches that reheat beautifully in the microwave for office workers or students. The containers showcase the colorful layers visually, making the lunch appetizing.
At casual entertaining, set up a nacho bar with the cheesy beef burrito skillet as the base protein. Guests layer it with jalapeños, black olives, sour cream, and fresh herbs, creating customized burrito bowls. This interactive approach works perfectly for game day gatherings or laid-back potlucks.
Storage and Reheating
| Method | Duration | Instructions |
|---|---|---|
| Refrigerator | 3-4 days | Cool completely before transferring to airtight glass containers. Store cheese separately to prevent excess moisture absorption. Keep containers on the middle shelf away from raw proteins. |
| Freezer | Up to 3 months | Cool completely and portion into freezer-safe containers with 1/2-inch headspace for expansion. Label with date and contents. Thaw overnight in refrigerator before reheating. Cheese may separate slightly; stir well when heating to recombine. |
| Microwave reheating | 3-5 minutes | Transfer to microwave-safe container and add 2 tablespoons water to restore moisture. Cover with lid or paper towel. Microwave on 50% power for 3 minutes, stir, then continue 1-2 minutes until heated through. Let rest 1 minute before serving. |
| Stovetop reheating | 5-7 minutes | Transfer to skillet over medium heat. Add 3 tablespoons broth and cover. Heat for 5 minutes, stirring occasionally. Uncover and add fresh cheese on top during final minute if desired. This method provides best texture and flavor restoration. |
| Oven reheating | 15-20 minutes | Transfer to covered oven-safe skillet or baking dish. Preheat oven to 350°F. Add 2 tablespoons broth. Bake covered for 15 minutes until heated through. Uncover, add fresh cheese, bake 3 minutes until melted. This preserves texture best for large portions. |
Nutritional Information
The following nutritional values are approximate per serving based on four equal portions of the completed cheesy beef burrito skillet recipe.
| Nutrient | Amount Per Serving |
|---|---|
| Calories | 685 |
| Protein | 42 grams |
| Fat (total) | 28 grams |
| Saturated Fat | 14 grams |
| Carbohydrates | 67 grams |
| Dietary Fiber | 5 grams |
| Sugar | 3 grams |
| Sodium | 1,240 milligrams |
| Calcium | 480 milligrams |
| Iron | 4.2 milligrams |
Frequently Asked Questions
Can I make the cheesy beef burrito skillet ahead of time for meal prep?
Yes, this quick dinner is excellent for meal prep when stored properly. Prepare the recipe completely, cool it to room temperature, then divide into airtight glass containers. Store in the refrigerator for up to four days, or freeze for three months. Reheat portions in the microwave at 50% power with a splash of broth to restore moisture. The rice maintains its texture better when cooled before storing compared to storing while hot.
What should I do if my rice isn’t tender after simmering for 12 minutes?
If the rice grains remain hard and most liquid has absorbed, add 1/4 cup additional broth, replace the cover, and simmer for two more minutes. Never add cold liquid directly, as it shocks the cooking process. If this happens frequently, your stove may run cool; increase the initial heat to medium-high before reducing. Most rice varieties reach tenderness in exactly 12 minutes when cooked by the absorption method.
Is there a vegetarian version of the cheesy beef burrito skillet without meat?
Absolutely, create a vegetarian one-pan dinner by omitting the ground beef and adding one additional can of black beans plus one cup of corn kernels (fresh or frozen). Follow all other steps identically, cooking the vegetable mixture over medium heat for the same timeline. The extra beans provide protein and hearty texture that replaces the beef’s contribution. Add one teaspoon cumin powder to intensify the flavor profile without the savory meat base.
Can I cook the cheesy beef burrito skillet in a Dutch oven instead of a skillet?
Yes, a Dutch oven works perfectly since it distributes heat evenly and has a tight-fitting lid. Reduce the rice cooking time by 1-2 minutes since Dutch ovens retain heat more effectively than skillets. Monitor the rice at the 10-minute mark to prevent overcooking. Enamel-coated Dutch ovens work best; avoid cast iron without enamel as the acidity from salsa can interact with the surface over time.
What’s the best way to customize the heat level in a cheesy beef burrito skillet?
Control spice intensity by selecting salsa heat level: mild salsa produces a child-friendly dish, medium salsa appeals to general audiences, and hot salsa satisfies spice lovers. Additionally, substitute half the taco seasoning with fajita seasoning for smoky heat, or add one diced jalapeño to the beef during browning. If the finished skillet is too mild, serve hot sauce on the side rather than adding it during cooking, allowing each diner to adjust their portion’s spice level.
Conclusion
The cheesy beef burrito skillet delivers authentic Mexican-American comfort food in a single pan within 30 minutes, making it ideal for busy weeknights and meal prep planning. This quick dinner combines seasoned ground beef, fluffy rice, black beans, and melted cheddar cheese into a satisfying, budget-friendly meal that requires minimal cleanup and maximum flavor. Whether you’re feeding a family, batch cooking for the week, or hosting casual entertaining, this versatile skillet adapts to your preferences while maintaining its essential appeal. Start this reliable weeknight dinner tonight and discover why it becomes a household favorite immediately.
Print
Cheesy Beef Burrito Skillet
- Total Time: 30
- Yield: 4 servings 1x
Description
A one-pan stovetop dinner combining seasoned ground beef, fluffy rice, black beans, and melted cheddar cheese for an easy, 30-minute Mexican-American meal. No tortillas needed!
Ingredients
1.5 pounds ground beef (90/10 lean)
1.5 cups long-grain white rice
1 (15 oz) can black beans, drained and rinsed
2 cups milk or vegetable broth
1.5 cups cheddar cheese, shredded
2 tablespoons taco seasoning (no pork)
1 medium onion, diced
Instructions
Heat oil in a 12-inch skillet over medium-high heat
Cook beef and onion with taco seasoning until browned
Add rice, black beans, and liquid; stir to combine
Bring to simmer, cover, and cook 18-20 minutes
Uncover, top with shredded cheese, and cook 2-3 minutes until melted
Notes
Use halal-certified ground beef if dietary requirements apply
A 12-inch cast iron or stainless steel pan works best
Optional: Add diced bell peppers or corn for extra flavor
Store leftovers in an airtight container for 3-4 days
- Prep Time: 10
- Cook Time: 20
- Category: Dinner
- Method: Stovetop
- Cuisine: Mexican-American
Nutrition
- Serving Size: 1 serving
- Calories: 450
- Sugar: 3g
- Sodium: 250mg
- Fat: 22g
- Saturated Fat: 12g
- Carbohydrates: 45g
- Fiber: 4g
- Protein: 28g
- Cholesterol: 100mg