Why This Banana Pudding Still Works
Some desserts survive trends because they solve a very specific craving. Banana pudding is cool, creamy, soft in the center, a little tender around the edges, and deeply nostalgic in a way that feels comforting after the very first bite.
This version is built for readers who want the classic Southern feel without cooking custard on the stove or turning on the oven. It gives you that familiar layered combination of vanilla pudding, ripe bananas, and vanilla wafers, but with a streamlined method that’s much more forgiving for busy home cooks. Banana pudding has long been tied to Southern gatherings and potluck-style hospitality, which is exactly why a no-bake version makes so much sense here.
As Maya Brooks, my goal is not just to help you make it, but to help you avoid the two things that disappoint people most: watery pudding and bananas that go brown too fast. Once you understand the few decisions that control texture, the rest becomes very easy.
The 5 Decisions That Make It Taste Classic
1. Choose bananas that are ripe, but not collapsing
You want bananas that are yellow with a few brown speckles. They should smell sweet and slice cleanly.
If they are too green, the flavor will feel flat. If they are very soft and heavily spotted, they may turn mushy once layered and chilled.
2. Use instant vanilla pudding for the easiest reliable set
Traditional Southern banana pudding is often made with custard, but easy no-bake versions became popular because they cut time and reduce risk. Instant pudding helps create structure fast, especially when you want a dessert that chills well for a party or family dinner.
3. Fold the pudding with whipped topping or whipped cream
This is what gives the filling that fluffy, cloud-like body people expect from a comforting banana pudding instead of a dense cup pudding texture.
For the easiest path, use thawed whipped topping. For a fresher flavor, use homemade whipped cream with a little vanilla.
4. Decide whether you want soft wafers or more bite
This is one of the biggest texture decisions in the whole recipe.
If you love a soft, cake-like pudding, chill it at least 6 hours or overnight. If you want the wafers to keep a little more definition, serve it after about 4 hours.
5. Build it in a deep dish, not a shallow one
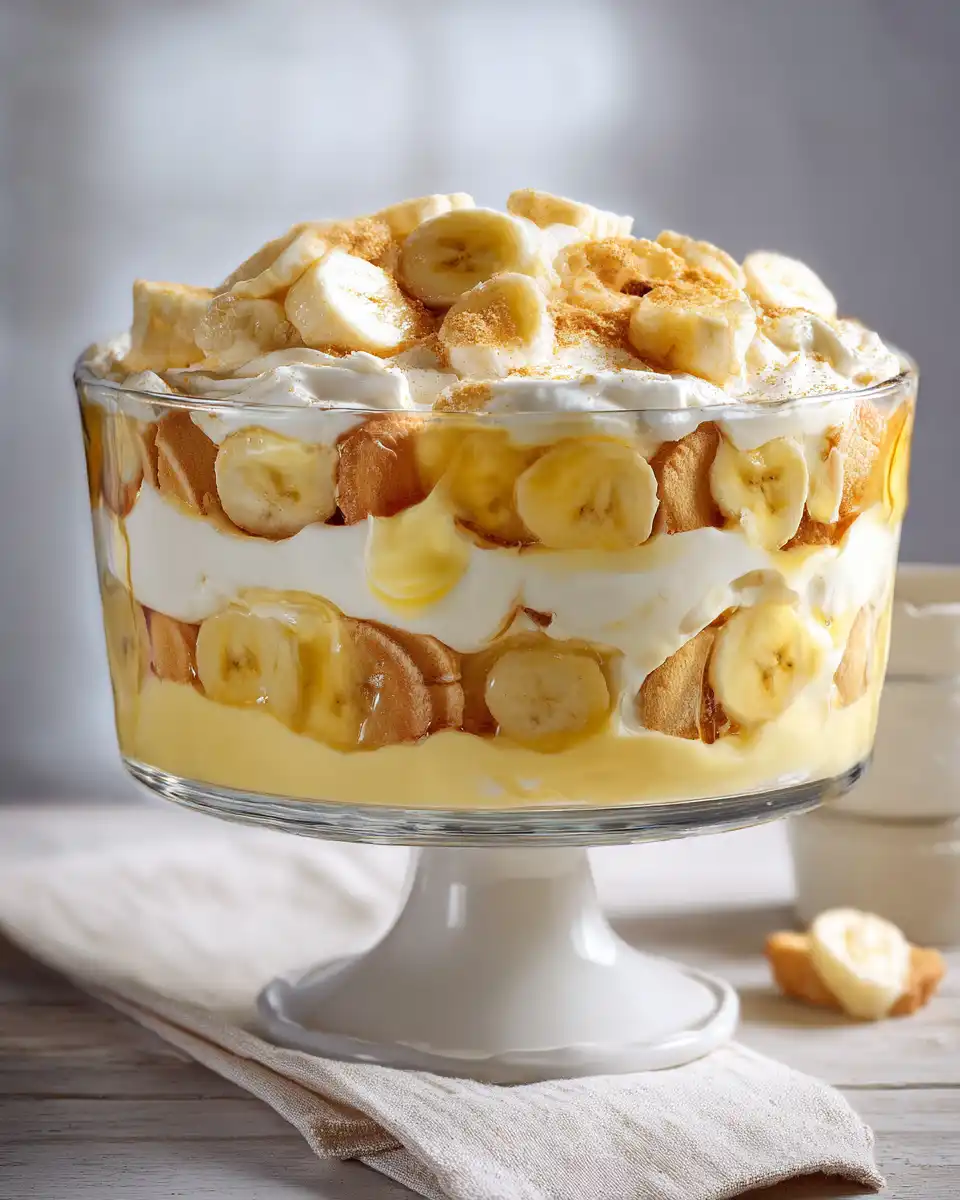
A deeper dish creates better layering and helps every spoonful include pudding, banana, and wafer. A 9×13 dish works well for a crowd, while a trifle bowl is ideal when you want visible layers.
Your Layering Lineup at a Glance
Instead of separating ingredients from the logic of the recipe, here’s exactly what each ingredient does for you.
For the creamy base
- 2 boxes instant vanilla pudding mix, 3.4 ounces each
- 3 cups cold milk
- 1 teaspoon vanilla extract
- 1 container whipped topping, 8 ounces, thawed
or - 2 cups heavy whipping cream, whipped to soft peaks
The pudding mix gives structure. The milk activates it. The vanilla rounds out the flavor, and the whipped layer keeps the dessert light instead of overly thick.
For the classic Southern layers
- 1 box vanilla wafers, about 11 ounces
- 4 medium ripe bananas, sliced
This is the familiar heart of the dessert. Early banana pudding recipes used cake or ladyfingers, but vanilla wafers became a defining version over time and are now closely associated with classic Southern-style banana pudding.
Optional finish
- extra crushed wafers
- banana slices for garnish
- a little whipped topping on top
Equipment that makes this easier
- large mixing bowl
- whisk or hand mixer
- rubber spatula
- 9×13-inch dish or trifle bowl
- sharp knife for clean banana slices
Build the Pudding for the Best Texture
Step 1: Make the pudding base
In a large bowl, whisk together the instant pudding mix, cold milk, and vanilla extract for about 2 minutes, until it starts to thicken.
Let it sit for 3 to 5 minutes. This short rest helps the mixture begin setting before you fold anything else in.
Step 2: Add the fluffy element
Fold in the whipped topping gently until smooth and evenly combined.
If using homemade whipped cream, whip it separately to soft peaks first, then fold it into the pudding mixture in two additions. This keeps the filling airy.
Step 3: Start with a light cushion of pudding
Spread a thin layer of pudding on the bottom of your dish first.
This small move helps keep the first layer of wafers from sliding and gives the dessert a softer, more unified base.
Step 4: Build the first full layer
Add a layer of vanilla wafers, then a layer of banana slices, then spoon over part of the pudding mixture.
Try to keep the bananas in a mostly even layer so every serving gets fruit. Repeat the process until the dish is filled, finishing with pudding on top.
Step 5: Cover the surface
Smooth the top gently with a spatula. Add extra crushed wafers if you like a little visual texture on top.
Press plastic wrap directly onto the surface if you want to minimize drying. Then cover the dish tightly.
Step 6: Chill before serving
Refrigerate for at least 4 hours.
That gives you a softer-set, spoonable dessert. For the most classic texture, especially if you want the wafers to soften into the pudding more fully, chill overnight.
Chill Time: When It’s Spoonable vs Sliceable
Banana pudding changes noticeably as it rests, and that matters more than many people realize.
After 4 hours
The pudding is cool and set enough to serve. The wafers still have a little bite, and the layers feel lighter and more distinct.
After 8 hours or overnight
This is where many people think banana pudding tastes best. The wafers soften, the banana flavor spreads a little more into the cream, and the dessert becomes more cohesive.
After 24 hours
Still delicious, but softer overall. This is great if you like the old-fashioned, almost cake-like texture that develops after a longer chill.
Smart Swaps That Keep the Southern Spirit
A good easy recipe should leave room for real-life flexibility. The key is making swaps that preserve the creamy, vanilla-forward, nostalgic identity of the dessert.
If you want a lighter-feeling version
Use light whipped topping and reduced-fat milk if your pudding mix supports it. The texture may be slightly less rich, but it still works well for a chilled family dessert.
If you prefer homemade whipped cream
Use homemade whipped cream instead of frozen whipped topping for a fresher dairy flavor. It feels a little less sweet and a bit more elegant.
If you want individual servings
Layer the pudding into jars or dessert cups. This is a great option for cookouts, showers, or holidays because serving is easier and the presentation feels special.
If you need a stronger banana flavor
Add one extra banana, but only if your dessert will be eaten the same day or the next day. More banana means more moisture, and that can shorten the ideal texture window.
If you love banana desserts in general
You might also enjoy the cozy loaf-style route in this banana bread recipe without butter or the richer dessert angle in this chocolate chip banana bread.
Make-Ahead, Storage, and Leftover Texture
This dessert is make-ahead friendly, which is one reason it works so well for holidays and gatherings.
Best make-ahead window
Make it the night before if possible. That gives the layers time to settle and makes the dessert taste more unified.
Refrigerator storage
Store banana pudding covered in the refrigerator. For best quality, eat it within 2 days, though refrigerated leftovers are commonly kept a bit longer depending on ingredient freshness. USDA guidance broadly recommends many leftovers be used within 3 to 4 days, and ripe refrigerated fruit quality is limited too, so banana pudding is definitely best earlier rather than later.
Will the bananas brown?
A little, yes. That is normal over time.
The best way to reduce browning is to use ripe-but-firm bananas, keep the dessert cold, and cover it well. Since the banana slices are tucked into pudding, they are partially protected from air exposure.
Can you freeze it?
I do not recommend it for best texture. The creamy filling and bananas can both become watery or grainy after thawing.
If you want another chilled dessert option with a make-ahead feel, this Philadelphia Cheesecake Recipe is a nice direction. For a crowd-friendly baked dessert, One-Pot Butter Pecan Pound Cake gives you a very different but equally comforting vibe.
Banana Pudding Questions People Actually Ask
Is banana pudding really a Southern dessert?
It is widely treated as a Southern classic today, even though its earliest roots are more complicated. Over time, it became strongly associated with Southern home cooking, church suppers, barbecues, and family gatherings.
Do I have to use vanilla wafers?
No, but they deliver the most recognizable classic result. Ladyfingers or plain vanilla cookies can work, though the flavor and texture will shift slightly.
What makes banana pudding go runny?
Usually one of three things:
- too much liquid
- not enough chill time
- overripe bananas releasing extra moisture
Can I make it the same day?
Yes. Give it at least 4 hours in the refrigerator. It will be more scoopable than sliceable, but it will still taste great.
Is homemade whipped cream better than whipped topping?
Not always better, just different. Homemade whipped cream tastes fresher. Whipped topping is more stable and often easier for beginners.
What dish works best?
A deep 9×13 dish is practical. A clear trifle bowl is prettier. Individual cups are best for parties.
Final Scoop
This easy banana pudding recipe works because it respects what people actually want from the dessert: creamy layers, soft cookies, sweet bananas, and that instantly familiar Southern comfort. It is simple enough for a weeknight dessert, but still special enough for holidays, potlucks, and family tables.
If you make it, let it chill fully and do not rush the layering. That one bit of patience is what turns a quick mixture into a truly satisfying dessert people go back for.